
NPS is a long-term investment product meant for retirement planning. Additional tax benefit under section 80CCD(1B), 60% lump-sum tax-free withdrawal on retirement, low-cost structure, decent performance track record makes it an attractive investment option. You may read about NPS in detail in this article.
Although previously many of the investors were reluctant to go with this product due to the withdrawal restrictions and operational difficulties, but I must say, NPS has evolved as an investment product and it has come a long way from its initial days of existence. You may go through the NPS withdrawal rules here.
Giving the investors an option to open and operate NPS accounts online or e-nps was a welcome step to ease out the process of making transactions and operating the account.
To make it more investor-friendly PFRDA has recently launched a D-Remit facility through which you can transfer your money directly to the NPS account and get the same-day NAV. It has also provided the investors an option to set up a Systematic Investment Plan or SIP in NPS, through the auto-debit facility of banks.
This article is about- How to start a SIP in NPS using the Direct Remittance or D-Remit Facility?
What is the D-Remit Facility in NPS?
D-Remit facility in NPS is an electronic system to transfer money directly to the NPS trustee bank account (currently Axis Bank), rather than going into the intermediary bank account and then transferred to the trustee bank.
In the current scenario, your contribution is transferred to the trustee bank account after two working days of investment i.e. T+2 days, even if it is made online through the e-NPS account. (Read: A step by step guide to create e-NPS Account)
This new facility would help you to get the same day NAV for the contribution made to the NPS account, if it is received before 9:30 AM (cut-off time) by the trustee bank except on public holidays, saturdays & sundays, else next working day NAV would be received.
All existing NPS subscribers can avail of this facility and there are no extra charges for the same. The minimum contribution done through this mode would be Rs. 500.
Through the D-Remit facility, you can also start a Systematic Investment Plan or SIP in NPS. You can set up an auto-debit from your bank account every month/quarter/year by giving standing instructions to your bank. The minimum SIP amount would also be Rs. 500.
How to start SIP in NPS using the D-Remit Facility?
In order to start SIP in NPS, using the D-Remit facility, you have to first create a Virtual Account (virtual ID) with the Trustee Bank which can be used for remitting your NPS contributions, and add it as a beneficiary through the net banking facility of your bank.
But before starting with the same, make sure that your Permanent Retirement Account Number (PRAN) is active and your Mobile Number is updated in NPS. ( Read more: SWP in NPS – Systematic Lump Sum Withdrawal in New pension Scheme )
Steps to create a Virtual Account Online:
Follow these simple steps to create the Virtual Account Online on the e-nps website:
- Visit the e-nps website
You have to visit the e-nps website. The URL of the same is- https://enps.nsdl.com/eNPS/NationalPensionSystem.html
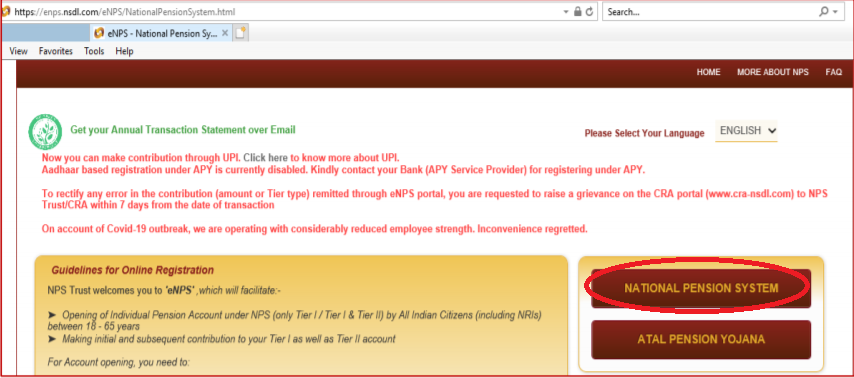
- Click on National Pension System
Click on the National Pension System button shown above. The following window would appear on clicking.
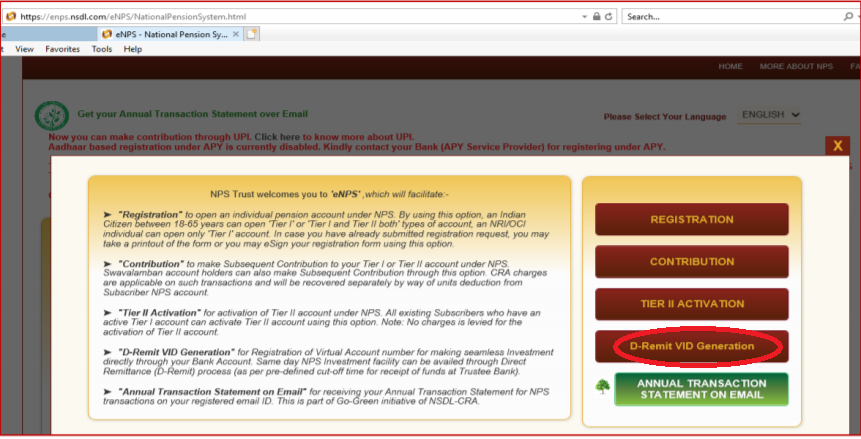
- Select “D-Remit VID Generation”
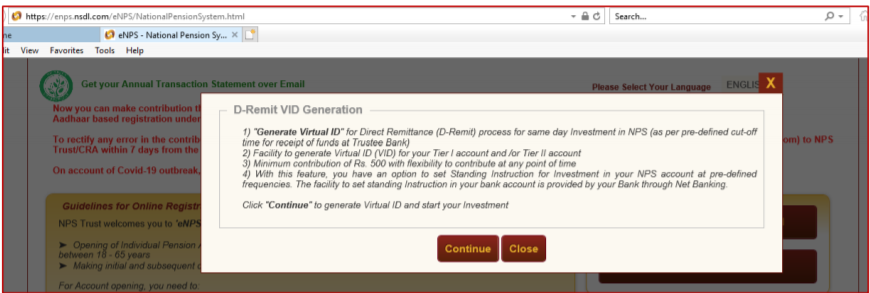
You have to select “D-Remit VID Generation” for creating a Virtual account as shown above. You will get a pop-up message containing information about the D-remit account. Read these points and click on ‘continue’ to proceed further.
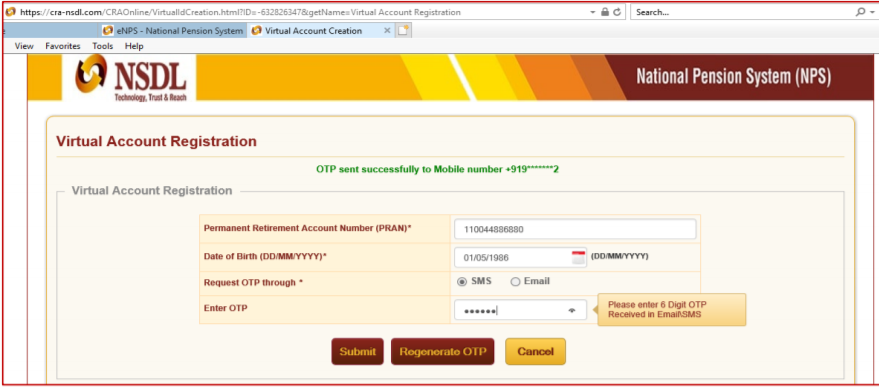
- Enter the Details
Once you click on ‘continue’ the following screen will be displayed where you have to carry out virtual account registration by entering Permanent Retirement Account Number (PRAN), Date of Birth (DoB), mode of receiving One Time Password (OTP), and captcha.
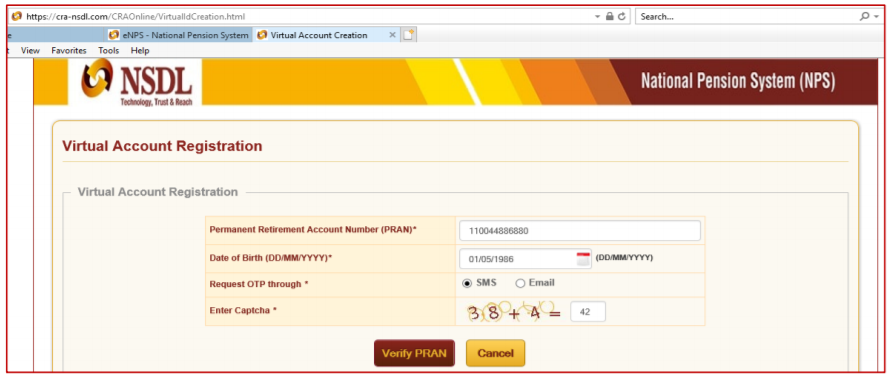
- Enter OTP to verify PRAN
Next, you need to click on ‘verify PRAN’. Upon verification of PRAN, OTP will be sent to your registered mobile no. (If the mobile no. is selected) and on email ID (if email ID is selected). Enter the OTP and click ‘Submit’.
- Select ‘Virtual Account Registration’ Type
Now, you have to select “Virtual Account Registration” Type i.e. for Tier I/Tier II, and click ‘Generate Virtual Account’.
Please remember, you need to have unique virtual accounts for both tier 1 and tier 2 accounts. In other words, if you choose the both option, two separate accounts would be created for each tier. The sixth digit of your Virtual Account with ‘1’ or ‘2’ is the identifier for Tier I and Tier II accounts respectively.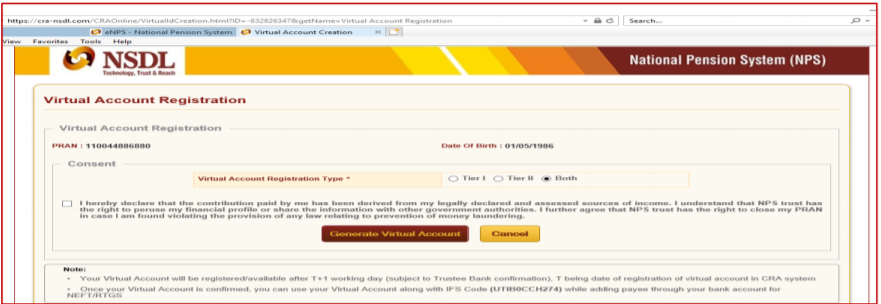
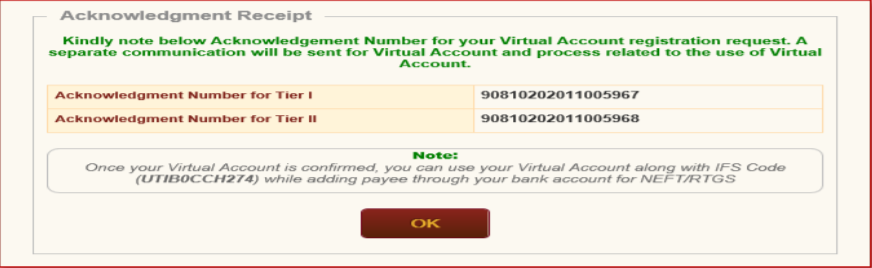
- Acknowledgement
Once you are done with this, you will get an Acknowledgement as shown below-
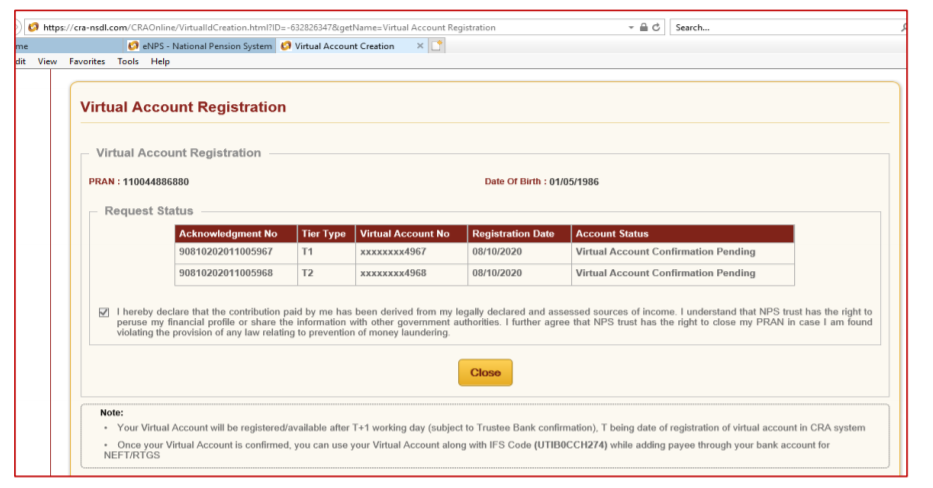
- Virtual Account Registration details
By clicking on “Ok” you will be able to view the Virtual Account Registration details as shown below. Virtual Account confirmation by NPS Trust will be pending. The same will be registered by the next working day.
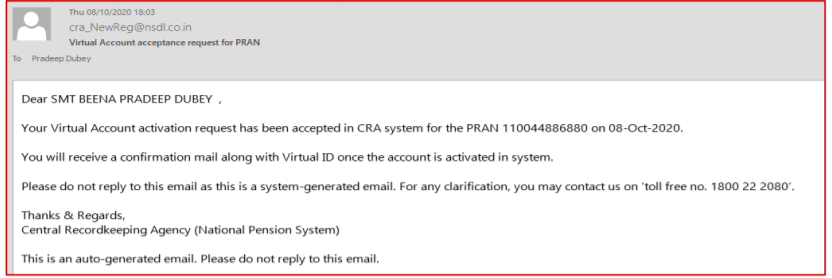
- Confirmation e-mail
You will receive an email confirming the activation request as shown below-
- Account activation confirmation
Another confirmation email would be received, once your virtual account gets activated.
Also Check- How much pension can you get from NPS Annuity Plans
How to Add this Virtual Account as a Beneficiary?
Once the virtual account created using the steps mentioned above gets activated the next working day, you may add this account as a beneficiary using the Net Banking facility to start SIP in NPS. Here are the steps:
- Login to the Net Banking Portal of your Bank.
- Now you need to add this Account as ‘beneficiary account’ along with your name as mentioned in the NSDL-CRA records as ‘beneficiary name’.
- You need to enter ‘UTIB0CCH274’ (the fifth character is ‘zero’) as IFS Code of Axis Bank (Trustee Bank) for transfer of funds and account type as ‘Current Account’ if required. You may re-confirm the details from here.
After doing this, you may start investing in NPS as per your convenience through the D-Remit Facility, which would help you fetch the same-day NAV on your investment (if funds are received before 9:30 AM).
You can also start SIP by giving standing instructions to the bank, a fixed amount would be directly debited every month from your bank account and would get deposited in NPS, just like we do in Mutual Funds.
Also Check- National Pension Scheme (NPS) for NRIs- a detailed guide
SIP in NPS- Final words:
D- Remit facility is a wonderful initiative taken by the PFRDA. As evident from the steps mentioned above, it is not difficult to start SIP in NPS using this facility. Through this facility investing in NPS would be as convenient as SIP in mutual funds, putting less burden on your pockets. (Read: All you wanted to know about SIP in Mutual Funds)
Through this mode now NPS investors can also reap the benefits of rupee cost-averaging and would help them inculcate a saving discipline as well.
This article is written by Mr. Varun Baid, Certified Financial Planner


 Manikaran Singal is the founder and Chief financial planner at Good Moneying Financial Solutions. He is a CERTIFIED FINANCIAL PLANNER CM and SEBI registered Investment adviser (Regd no. INA 100001620). He’s having 20+ years of experience in financial services space.
")


What does “Same day NAV” means? Let’s say for example if I make payment before 9.30 a.m. through D Remit facility on 1st August, will I get NAV of close of trading for 1st August?
Hi Lokesh,
Yes, your understanding is correct.
Hello,
Which day would be the best to setup SIP? in order to get good NAV.
Is there particular days in the month that are better? or any day would work for a long term SIP?
Thanks.
Hi Mayur,
Any day would work for setting up SIP. It makes hardly any difference.
Read this: https://primeinvestor.in/which-date-is-the-best-for-sips/
For Lumpsum investment I need to pay Rs.118/- extra as charges.
is this charges payable in case I do SIP to NPS ???
Hi Pradip,
The charges would be 0.10% of the contribution amount, subject to a minimum of Rs. 10 and a maximum of Rs. 10,000. You may visit this link for details- https://www.pfrda.org.in/index1.cshtml?lsid=99
really helpful information. I follow the given instruction and done.
thank you.
Thanks, Shiv:)
Why OCI user is not allowed to generate Virtual Account to use Direct Remit ??
For OCI persons the D-Remit option to avail same day NAV is not yet available. Will PFRDA take care of this soon ?
Can you address this ?
Hi Sam,
We understand your concern. Other OCIs would also have similar concerns. Maybe PFRDA is looking into it and your queries get resolved soon.
Can you tell me how to setup SIP in NPS through KCRA?
Hi Anil,
The process of setting up SIP through the D-Remit facility more or less remains the same as described in the above article. You can visit the below link to create your virtual id and set up sip through KCRA.
https://enps.kfintech.com/dremit/prelogindremit/
Excellent Article, Thanks for this
Ameet
Thanks Ameet. Glad you liked it:)
I am unable to see tier 2 option while creating the NPS virtual ID for D-Remit, but your screenshot shows it saying we need to select ‘both’. I do not get that option at all. Could you please help? I understand tier 2 withdrawals have more flexibility.